GE 24962 User Manual
Browse online or download User Manual for Remote controls GE 24962. GE 24962 User's Manual
- Page / 16
- Table of contents
- BOOKMARKS
- Universal Remote 1
- Instruction Manual 1
- TableofContents 2
- Battery Installation 3
- Battery Saver 3
- Code Saver 3
- Code Setup 3
- ButtonFunctions 4
- ButtonFunctions,cont 5
- SHIFTFunction 6
- DirectCodeEntry 7
- CodeSearch 8
- CodeIdentication 9
- UsingYourRemote 10
- Power On and Off Buttons 10
- Controlling Combo Devices 10
- DVR/DVD Punch-Through 10
- UsingYourRemote,cont 11
- Volume/Mute Control 12
- 90DayLimitedWarranty 14
Summary of Contents
Universal Remote Instruction Manual24962
10 UsingYourRemoteControlling Devices with Separate Power On and Off ButtonsSome GE, RCA and ProScan models require you to press the device button
11Volume/Mute Control and Punch-ThroughThis remote lets you select which device Mode controls your Volume/Mute buttons. The remote is initially set fo
12 UsingYourRemote,cont.Setting any Mode to use its own Volume/Mute ControlThis routine can set any Mode to use only its own Volume/Mute control.
13Remote does not operate your product.• Press the mode button of the product you want to control.• Program the remote with a new code.• Install
14Jasco Products Company warrants this product to be free from manufacturing defects for a period of ninety days from the original date of consumer pu
Jasco Products Company10 E. Memorial RoadOklahoma City, OK 73114-2205Made in China 24962-03/10Universal Remote Inst
2Congratulations on your purchase of the 24962 Universal Remote Control. The 24962 is one of the most easy to use remote controls available today. Wit
3Battery Installation1. On the back of the remote, push down on the tab and lift the cover off.2. Match the batteries to the + and - marks inside th
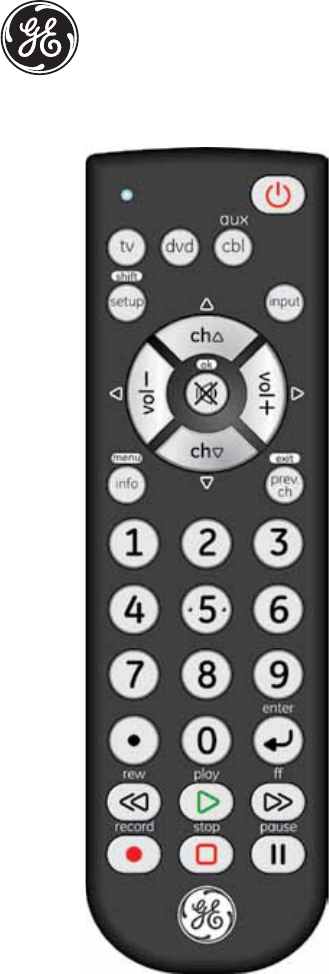
4MUTE Turns off the TV sound while the picture remains. OK Selects menu items for the device you are controlling.INFO button brings up DVD Display or
5VOLUME UP/DOWN Changes the volume level of the product, normally the TV.NUMBERSEnter numbers for direct channel selection. Someproducts require ENTER
6Press SHIFT (Setup) prior to the shifted key func-tion, e.g., for MENU - press and release SHIFT (Setup) then MENU (Info).UP - press and release SHIF
7 DirectCodeEntryWrite your codes down here for easy reference later.1. Press and hold the SETUP button until the red indicator stays on, then re
8 CodeSearchIf your device does not respond after you have tried all the codes for your brand, or if your brand is not listed, try searching for you
9 CodeIdenticationThe Code Identication Feature allows you to identify the 4-digit library code stored under your device key. For example, if you
Related products and manuals for Remote controls GE 24962

 (28 pages)
(7 pages)
(40 pages)
(28 pages)
(7 pages)
(40 pages)
© 2020, manymanuals.com. All rights reserved. | 1.626 s |
 Manymanuals.com
 Manymanuals.de
 Manymanuals.fr
 Manymanuals.it
 Manymanuals.pl
 Manymanuals.cz
 Manymanuals.es
 Manymanuals-pt.com
Comments to this Manuals